Forest Road Deactivation Practices
in the Pacific Northwest Navigation text
Navigation bar (text links below) Home Table of Contents section 01 section 02 section 03 section 04 section 05 section 06 section 07 section 08 section 09 section 10 section 11 section 12 section 13 section 14 section 15 section 16 section 18 section 18 section 19 section 20 section 21 section 22 section 23 section 24
21 - Wood Culvert Removal Sequence of Activities, Peak Flow Estimates

General Considerations

The removal of all drainage structures must address water quality and slope stability concerns. Operators and supervisors should consult the pre-work checklist to avoid unnecessary delays, negative impacts and unexpected problems. Sediment control is difficult to achieve if the required tools are not at the work site.

If at all practical, it is preferable to work in dry conditions. This can be achieved by scheduling the work during the summer months, or by dewatering the stream. Remember that each stream crossing presents its own challenges. Deactivation specialists, supervisors and operators should discuss available options before work begins.

Suggested Sequence of Activities for Wood Culvert Removal

  1. Know the water quality issues before deactivation starts.
  2. Divert water flows, if at all practical, to work in the dry. However, in steep terrain, do not simply direct water down the ditch.
  3. Install sediment control downstream from the culvert.
  4. Remove the road fill from the vicinity of the culvert until the four corners of the culvert are visible.
  5. Remove all surfacing from the culvert deck on the woods side.
  6. Remove the fill from in behind the sill to within 0.3m (1ft) of the base. Leave some material on the upstream side (inlet) to maintain the water flow through the structure.
  7. Slope the side of the channel to a stable angle.
  8. Remove the wooden deck.
  9. Move the excavator to the camp side; use puncheon if the creek is too wide to span with the machine tracks. Follow the principles of removing deep fills.
  10. Remove puncheon and woods end sill from channel.
  11. Excavate material from behind camp end sill and remove sill.
  12. Complete cross-ditch and armour the channel as required.
  13. Remove trapped sediment and sediment control devices once the water runs clear through the deactivated site.

Peak Flow Estimates

Be sure to know to what return flood you are managing water flows. Is it the Q-100 flood, i.e., the most amount of water you would expect once in a 100-year period? Ask your supervisor, as this affects the amount of armour required for newly established stream channels.

Figure 20: Typical Stream Cross-Section
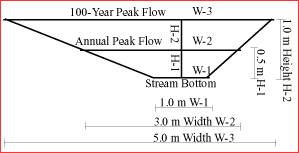
diagram: typical stream cross-section

The cross-sectional area of a stream during a Q-100 flood is about 3 times bigger than the cross-sectional area of the stream during the annual peak flow. Therefore, estimate the annual high water mark, calculate the annual peak flow cross-section and multiply this area by three. Using the Q-100 peak flow area, you can estimate from that how high armour has to be placed to protect newly established stream channels.

diagram: annual peak flow and Q-100 peak flow
21 - Wood Culvert Removal
 
Back Back Top of Page Top of Page
Home Home
Table of Contents Table of Contents  
Next Next
Introduction  1  section 01
Water Management  2  section 02
Revegetation  5  section 05
Sediment Control  6  section 06
section 13  13  Blanket Drains
section 14  14  Trench Drains
section 15  15  French Drains
section 16  16  Fords
section 21  21  Wood Culvert Removal
section 24  24  Pre-Work Checklist
©1999 - 2002 Flip Productions Limited
Used with permission by CulvertBC